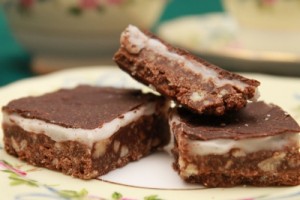
These are so easy to make and they make a lovely after-dinner mint which is sadly lacking these days since pretty much everybody commercial has started to put milk/butterfat into plain chocolate. You do need to be lucky and have one of the few stores to have dairy-free digestive biscuits on their shelves nearby, but you can always make a batch of basic biscuits to crush up if you have to. I’ve recently discovered that Morrison’s value digestives are dairy-free and I’m told that the Co-op do vegan digestives, as well as Dove’s Farm if you can find them.
For this recipe you will need: a shallow baking tin (at least 9″ square, but a swiss roll tin will do fine as long as you don’t expect to fill it); foil; a food processor or a strong plastic bag and a rolling pin; a glass bowl and a heavy-bottomed saucepan.

Ready to eat!
Recipe: Choc-mint Squares
Ingredients
- ½lb / 225g digestive biscuits
- 3oz / 85g dairy-free spread
- 4oz / 115g Kinnerton’s plain chocolate
- 1tbsp brandy (optional)
- peppermint essence
- at least 8oz /225g icing sugar
- a few drops of green food colouring (optional)
- another 3oz / 85g Kinnerton’s plain chocolate
Instructions
- Line a shallow square or rectangular baking tin with foil.
- Crush the biscuits to fairly fine crumbs either in a bag with a rolling pin or using a food processor.
- Melt the spread and chocolate in a saucepan over a low heat. Keep an eye on it and stir frequently to make sure that it doesn’t overheat as that will spoil the chocolate. On no account let it boil!
- Stir in the biscuits and the brandy if you wish to use it.
- When your mixture is even, tip it into the tin and flatten it out until it is about ½” / 1cm thick and leave it to cool and set.
- Mix the icing sugar with water. Only about a desertspoonful of water at first. You always need less water than you think you will to make water icing. This is a bit trial and error as it seems to vary from one time to the next. You’re aiming for a thick texture which is only just spreadable. If it is any softer it will simply run off the biscuit base.
- When you’re happy with the icing, mix in a couple of drops of peppermint essence and the food colouring (if you wish to have green icing). Always taste the icing to check that you have the peppermint flavour right. Don’t add too much straight away: you can always add more, but if you put in too much, it will taste like toothpaste: yuk!
- Pour the icing over the base and allow it to set.
- Melt the extra chocolate and pour it over the icing. Allow it to set. Do not be tempted to chill it in the fridge to hurry it up or your chocolate will go all cloudy.
- Cut up into squares and tuck in! Oh, it does keep in an airtight box for about a week if it gets the chance!
Variations
I now make mine without the green food colouring and it’s just as good, if not better!
Cooking time (duration): 20 minutes + 3 lots of setting time (about an hour each).
Diet type: Dairy-free
Number of servings (yield): about 20-25 squares, depending on how you choose to chop it up.
Meal type: dessert
Culinary tradition: English
Microformatting by hRecipe.

Recent Comments