|
|
The Bluebird Tea Rooms on the main hill in Great Malvern are a wonderful find. They offer dairy-free cakes (they also have gluten-free things on offer) and a traditional tea room atmosphere. The setting is lovely and the food is good. You do need to be prepared to wait for a table at busy times of day, but the wait is worth it. The tea is good and the cakes we had were excellent.
A lovely way to wind up a day on the hills.
Blue Bird Tea Rooms 9, Church St., Great Malvern, Worcestershire, WR14 2AA
Telephone: 01684 561166
For other choices, see our reviews page of places to eat out
These make a great alternative to a slice of cake in a lunchbox. They taste delicious and the oats mean that they’re good for slow release energy to get you through the afternoon. They’re quick and easy to make, they keep for about a week in an airtight box: can’t ask more than that!
Recipe: Cherry Oat Munchies
Ingredients
- 9oz / 250g Tomor, softened
- 1¾oz / 50g caster sugar
- 3½oz / 100g light muscovado sugar
- 5½oz / 150g self-raising flour
- 8oz / 225g porridge oats
- 7oz / 200g glacé cherries
- 1¾oz / 50g sultanas
Instructions
- Get the Tomor out of the fridge and put it somewhere warm about 1/2 an hour before you want to start cooking.
- Pre-heat the oven to Gas Mark 4 / 180C / 350F.
- Line 2/3 baking sheets with silicone parchment. In a bowl, beat together the caster sugar, the light muscovado sugar and the softened Tomor until they become pale and fluffy. (If you have forgotten to get the Tomor out earlier, zap it in the microwave in a small bowl for 30 second bursts until it looks soft, but isn’t running all over the bowl.)
- Stir in the flour and oats and mix them well in.
- Roughly chop about ¾ of the cherries.
- Stir in all the cherries and the sultanas.
- Shape the mixture with your hands and pat the cookies slightly flattish on the baking sheet. Try to leave them a little rough on top as this gives a lovely rustic, crunchy finish. The mixture is sticky, but not impossibly so.
- You should get about 20 munchies, but it does depend on how big you want them! They will spread slightly while cooking and if they’re too close together, they end up as squares instead of rounds; but I’ve never yet found that square sides make them last any longer in the tin! If you’re making them for an occasion, be sure to allow space between them for the spreading so that you end up with lovely round munchies.
- Bake them for 15-20 minutes until golden and smelling divine.
- Allow them to cool on their trays for 5 minutes, then gently remove them to a cooling rack and allow them to cool completely.
Preparation time (duration): 15 minutes
Cooking time (duration): 15-20 minutes
Diet type: Dairy-free
Number of servings (yield): 20 ish
Meal type: snack
Microformatting by hRecipe.
For good Thai food at lunchtime on a Saturday, you could try The Red Lion.
The Red Lion, 4 Saint Ann’s Road, Malvern, Worcestershire WR14 4RG 01684 564787
We’ve eaten here three times now on Saturdays at lunch time and have had excellent Thai food. There are other dishes on offer, some of which are non-dairy, but it’s the Thai that we go back for. The landlady is Thai (owns and runs the restaurant next door, we think) and the cooking is authentic and safe (dairy-free-wise). Having googled the pub, I was surprised to find some very hostile reviews, but I can honestly say that we’ve never had anything but good service and excellent food. Each dish tastes distinctly different – as it should, but let’s face it, in many places all the Thai tastes the same and all the Indian dishes taste the same. Here, each dish has its own character and is freshly cooked. Yes, you have to wait, but not longer than you would expect for freshly cooked food. I haven’t been there in the evening when it may well be busier and therefore slower, but for me it’s a good place to go when you’ve been up on the hills all morning, are deep frozen and in need of some good food to thaw out with! Oh, and they have a choice of ales too. Doesn’t get much better than that!
For other choices, see our reviews page of places to eat out
It suddenly dawned on me a couple of days ago that what we could do with is a site which listed places where you could eat out as a dairy-free bod without being made to feel weird or a right nuisance and without having to put up with dry, over- grilled pork chop and green beans drenched in oil. (I kid you not. We were subjected to that at a restaurant with a good reputation and various marks of excellence… in France.) So here it is! Since no-one else is doing it, I’ll put anywhere we try and enjoy on the reviews page. It should grow with time, so do keep checking!
I can’t promise desserts at many places, unless you are still prepared to eat everlasting fruit salad. In this family we’ve eaten enough fruit salad to last us a lifetime, so we tend not to bother with dessert. However, that apart, all the places on this list are places we have eaten at and had a good reception, or stayed at and been made to feel welcome. We have eaten well and not been made ill! Always a plus!!
The first place to go on our new list is:
The Unicorn, 2 Belle Vue Terrace, Great Malvern, Worcestershire, WR14 4PZ 01684 574 152
This is a traditional pub which serves well-kept real ale and good food. It isn’t a pretentious place. The staff are friendly and know their menu inside out. The food is all cooked on site and is good. It isn’t frilly, but personally I’d rather have it good than fussy. They offer everything from curry to cajun salmon and Somerset pork, all of which are dairy-free. If you want to be sure that your choice is safe, the staff know exactly what is in each dish as everything is cooked on site. The portions are amply generous and the atmosphere is warm and welcoming. Even on Sundays, they have a menu on offer other than Sunday roast. We’ve now eaten there four times over the last year when we’ve been over that side of the country…and we shall be going back.
For other choices, see our reviews page of places to eat out
These are easy to make and taste DIVINE! They melt in the mouth and they make great presents for teachers at the end of term. You can put a handful in a little cellophane bag, tie it up with some gift ribbon and voilà, one individual present at less cost than a box of chocs and which will be much more appreciated because it’s homemade. That’s a win as far as I’m concerned! Alternatively… you could make a batch for your beloved on Valentine’s Day.
 Viennese fingers cooling off
Recipe: Viennese Fingers
Ingredients
- 8oz / 250g Pure Sunflower Spread
- 2oz / 60g icing sugar, sifted
- 1/2 teaspoon vanilla extract
- 8oz / 250g plain flour
- pinch of salt
- 1/2oz / 15g pistachio nuts, skinned and chopped (optional)
- 2oz / 60g Kinnerton’s chocolate, smashed up into little pieces (I whack the sealed packet on the edge of the worktop: emotionally satisfying and very effective!)
Instructions
- Preheat the oven to Gas 4 / 180C / 350F
- Line several baking trays with silicone paper.
- Fit a piping bag with a 1cm / 1/2″ ten point star nozzle.
- Using a hand-held electric mixer, beat the Pure spread with the icing sugar until the mixture is very light and creamy.
- Beat in the vanilla extract.
- Sift the flour and the salt into the bowl and beat it in with a wooden spoon. You will end up with a soft dough.
- Spoon it into the piping bag and twist the top round to keep the mixture in the bag when you squeeze it. Don’t over-fill the bag or you’ll end up wearing the mixture instead of having it on the trays! You need about a third of the bag left empty so that you have something solid to hang on to. Otherwise, the mixture squirts out in all directions. You can always put some more in the bag when you run out.
- Pipe strips of mixture about 21/2″ / 6cm long, cutting off the strips at the nozzle with a sharp knife.
- If you wish to use the pistachio nuts, this is when you sprinkle them on the strips of mixture.
- Bake in the oven for 20-25 minutes until they are pale gold. Don’t over-bake them or you will spoil the melt-in-the-mouth texture.
- Leave them to cool on their trays for a few minutes, then put them onto wire racks to cool completely.
- While they cool, put the chocolate in a glass bowl placed over a pan of boiling water. Be very careful that the bottom of the bowl stays clear of the water or your chocolate will be spoiled.
- When the chocolate is completely smooth, dip both ends of each biscuit into the chocolate. Put them back on the silicone paper to cool and set.
Quick Notes
The number of biscuits you get out will vary from batch to batch depending on how enthusiastic you are when you are piping.
Preparation time (duration): 10 minutes
Cooking time (duration): 20-25 minutes
Diet type: Dairy-free
Number of servings (yield): 24(ish)
Meal type: snack
Microformatting by hRecipe.
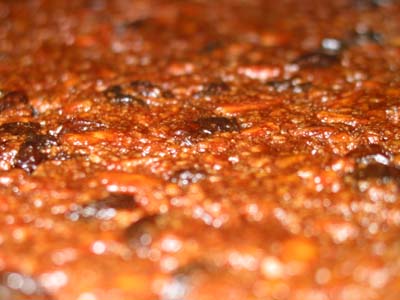
Happy New Year everybody! Now that we’re all back into termtime and having to fill lunchboxes again, I thought a quick and easy traybake might go down well. My two love these and they’re easy enough for children to be able to make themselves. Commercial cereal bars frequently have a great deal of sugar in them, so is you’re trying to reduce your kids’ intake of sugar without them really noticing, this is one for you! And they’re really quick to throw together too.
This is another recipe from my mother-in-law and it has the old-style Australian approach to measurements which uses weight for wet or sticky ingredients and volume measured in cups or part cups for the dry ingredients. Don’t be put off by this. If you don’t have measuring cups, just use a teacup. After all, that’s how these recipes were originally made. Yes, the measurements will be a little less precise than with a scales, but this kind of recipe can cope with a bit of fuzziness here and there! If you really can’t be parted from your scales, 1 cup is more or less equivalent to 8oz / 240g. It’s not precise as the volume of 8oz of muesli is much greater than 8oz of sugar, but it’s close enough for it to work.
Recipe: Muesli Currant Bars
Ingredients
- 2oz / 60g softened Tomor
- ½ cup granulated sugar
- 2 eggs
- ¾ cup plain flour
- ½tsp baking powder
- 1 cup muesli
- 2tsp lemon zest
- 2tbsp lemon juice
- 1 cup currants
For the lemon icing
- 1tbsp lemon juice
- ¾ cup icing sugar
Instructions
- Pre-heat the oven to Gas Mark 4 / 180C / F
- Line/grease a baking tray. I tend to use foil so that I can lift out the finished baking to cut it on a board rather than damage the surface of my tin.
- Cream the Tomor and sugar together until it is light and fluffy.
- Add the eggs one at a time (with a table spoon of the flour for each egg) and beat each one in until the mixture is smooth. If the mixture starts to curdle, just add a little bit more flour.
- Stir in the muesli, lemon zest, lemon juice and currants.
- Pour the mixture into the tin and spread it out with the back of a spoon, firming it down gently until it is level and smooth.
- Bake in the middle of the oven for about 30 minutes until the top is golden.
- Allow to cool in the tin.
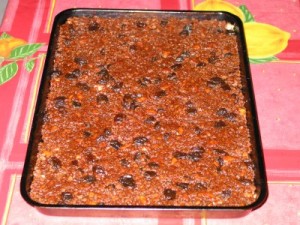
- When it is completely cold, cover it with lemon icing made by mixing the lemon juice with the icing sugar. The mixture should be thick or it will run all over everywhere. I find icing sugar seems to behave differently every time I use it, so be prepared to adjust the quantity of either sugar or lemon juice depending on how the texture turns out.
Preparation time (duration): 15 minutes
Cooking time (duration): 30 minutes
Diet type: Dairy-free
Number of servings (yield): 12+
Meal type: snack
Microformatting by hRecipe.
This is a tasty soup, with the rich orange colour of autumn leaves. It makes a quick, tasty lunch served with a hunk of No-Knead Bread.
Recipe: Autumn Soup
Ingredients
- a slosh of olive oil
- 1 clove of garlic
- 1 medium onion, chopped
- 12oz / 340g butternut squash, diced
- 3 carrots, diced
- 1 large sweet potato, diced
- a pinch of mixed herbs
- 2 pints / 1 litre hot water or chicken stock if you have your own
- 2 stock cubes (Kallo organic are good) if you have no stock
Instructions
- Heat the olive oil in your pressure cooker over a medium heat.
- Soften the onion for about 10 minutes while you chop the other veg. Stir regularly to avoid burning them.
- When the onion is golden and soft, add the garlic and herbs and fry off for a minute or two.
- Toss in the rest of the veg and give it all a good stir about to coat it all with the oil, herbs and garlic.
- Add the stock (or the stock cubes and hot water).
- Close up your pressure cooker and turn up the heat to get it up to pressure.
- Cook for 10 minutes at high pressure, then relase the pressure in accordance with the instructions for your particular pressure cooker.
- When it has cooled just a fraction, whizz it with a hand-held blender, taste it and adjust the seasoning.
- Serve with a hunk of fresh bread – and enjoy!
Quick Notes
You can adjust the proportions of the various veg in this to suit your own tastes. More sweet potato will give you a thicker soup.
Preparation time (duration): 10 minutes
Cooking time (duration): 10 minutes
Diet type: Dairy-free
Number of servings (yield): 8
Meal type: lunch
Microformatting by hRecipe.
This is my latest variation on the ever-faithful no-knead recipe. It makes a great breakfast bread and a ‘spreaded’ slice makes a good snack for school, or for those days when you have to go straight from school to a club of some sort.
The basics of the recipe are the same as the original with a number of additions. As before, you will need a large mixing bowl and a lined 9″ square (or equivalent volume) tin.
Recipe: Fruit Loaf
Ingredients
- 540g / 1lb 3½oz bread flour
- 1/2 tsp active dried yeast
- 1/2 tsp sugar
- 1 tsp salt
- 50g / 2oz soft dark brown sugar
- 175g / 6oz mixed dried vine fruits (with or without citrus peel as you wish)
- 1 tsp ground cinnamon
- 1 tsp freshly grated nutmeg
- 360ml/13floz hot water
- 2 tbsp flavourless vegetable oil
Instructions
- Mix all the dry ingredients together very thoroughly, ensuring any lumps in the sugar are completely broken up and everything is evenly distributed.
- Add the water and the oil.
- Mix thoroughly with your hand until you have an evenly wet, gloopy heap in your bowl. If the dough is at all dryish, add a little more warm water and mix thoroughly until it goes suitably gloopy. You’re very unlikely to make it too wet, but if it’s too dry you just won’t get a good rise.
- Scrape your hand clean and cover the bowl with cling film.
- Leave on the worktop in the kitchen to rise for at least 6 hours, preferably nearer 8 hours. Do not put it anywhere like an airing cupboard. It’s meant to rise very slowly.
- When it has almost filled the mixing bowl, tip it out onto a well-floured board and scrape out the bowl.
- Fold it around until you have a less sticky surface to handle, then flatten it out into a rough rectangle.
- Fold one end in to the middle, then fold the other end over the top and shape your loaf for its tin.
- Pop it in, cover it with oiled cling film and leave it overnight to rise, again just sitting in the kitchen, not anywhere near a heat source.
- In the morning, pre-heat the oven to Gas Mark 7/ 220C/200C fan ovens, bake for 25 minutes then carefully and gently remove from the tin, take off the lining paper and pop the loaf back in the oven for another 5 minutes until the base sounds hollow when tapped with a knuckle.
- Leave to cool on a rack for as long as you can resist the smell. It really does need about 10 minutes before you can cut it without mashing the whole loaf!
Quick Notes
The smell of this baking before breakfast gets everybody downstairs in double quick time: always useful on a school morning!
Preparation time (duration): 20 minutes plus about 16 hours rising time
Cooking time (duration): 30 minutes
Diet type: Dairy-free
Number of servings (yield): 12+
Meal type: breakfast
Microformatting by hRecipe.
This is the version you make when you need a dessert which you can throw together then stuff in the fridge and forget about overnight until you need it! It still tastes good and, just like the original, it matures over a day or two in the fridge. This version requires no cooking at all! It is vegetarian, but not vegan as sponge fingers/boudoir biscuits have egg in them.
Recipe: High-Speed Tiramisu
Ingredients
- 1 box Alpro Dairy-free Custard
- 1 box Silken Tofu (either Morinu or Blue Dragon)
- about 1/2 a packet of boudoir biscuits (also sold as sponge fingers: check the packet carefully as some have milk powder in them)
- 2 tbsps Amaretto
- 4 tbsps Tia Maria
- 6 tbsps very strong coffee
- 1 tsp Coffee Drop
- 5 tbsps icing sugar, sieved
- 1 tsp vanilla extract
- 2 tsps lemon juice
- Kinnerton’s chocolate for decoration
Instructions
- Cover the base of your glass dish with a layer of sponge fingers, cutting them up to fit.
- Mix the liqueurs and the coffee together and apply half of the mixture to the fingers, soaking them thoroughly.
- Whizz (or beat with a hand mixer) the tofu until it is as smooth as you can get it.
- Beat in the custard, the vanilla, the lemon juice and the sieved icing sugar.
- Spread half of this over the layer of soaked sponge fingers.
- Cover this with another layer of sponge fingers. Be gentle or you will make them disappear at the edges! You want the layers to be visible.
- Soak the new layer of sponge fingers with the rest of the coffee mixture.
- Finish off with the rest of the custard mixture. Level it out and pop it in the fridge overnight.
- Just before serving, grate some Kinnerton’s chocolate over the top.
Quick Notes
Be careful when constructing the layers. They look good in a glass dish, but you do need to be gentle when making them.
Preparation time (duration): 20 minutes + overnight chilling
Diet type: Dairy-free
Number of servings (yield): 8(ish)
Meal type: dessert
Microformatting by hRecipe.
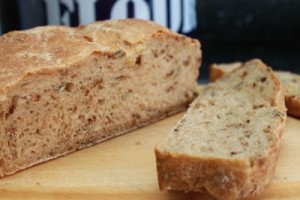 I have been playing around with the no-knead recipe over the last few weeks and here is one of the best variations so far. This is by far the easiest and cheapest way to have delicious seed bread for toast and sandwiches. My kids love the toasty taste of the seeds on the outside. I have been playing around with the no-knead recipe over the last few weeks and here is one of the best variations so far. This is by far the easiest and cheapest way to have delicious seed bread for toast and sandwiches. My kids love the toasty taste of the seeds on the outside.
Folllow the original no-knead recipe.
Before you tip out the dough to knock it back, sprinkle a small scattering of sunflower seeds over the board/table you use on top of your usual sprinkle of flour. Then tip out the dough and sprinkle another sparse layer of seeds over the sticky surface. Fold in the ends as usual and form the dough into baking shape. Put the dough into its tin or onto its tray, then take a last small handful of seeds and stick them over the surface by gently poking them into/onto the dough. Don’t worry that some of them fall off, they will be covered by the rising dough and incorporated into it.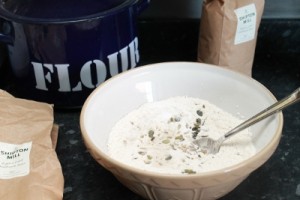
Leave to rise as usual for about 5 hours, then bake as per the original recipe.
The result is delicious, especially when eaten fresh and warm from the oven. The toasty roasty sunflower seeds on the top are irresistible! Try a hunk of this with a slice of ham and a dollop of pear chutney; or for dipping into a bowl of homemade pea soup. Yum!
If you want a change, try pumpkin seeds instead of sunflower seeds, or a mixture of the two. Also delicious!
|
|


 I have been playing around with the no-knead recipe over the last few weeks and here is one of the best variations so far. This is by far the easiest and cheapest way to have delicious seed bread for toast and sandwiches. My kids love the toasty taste of the seeds on the outside.
Recent Comments